A paper peony with the layers of the real thing.
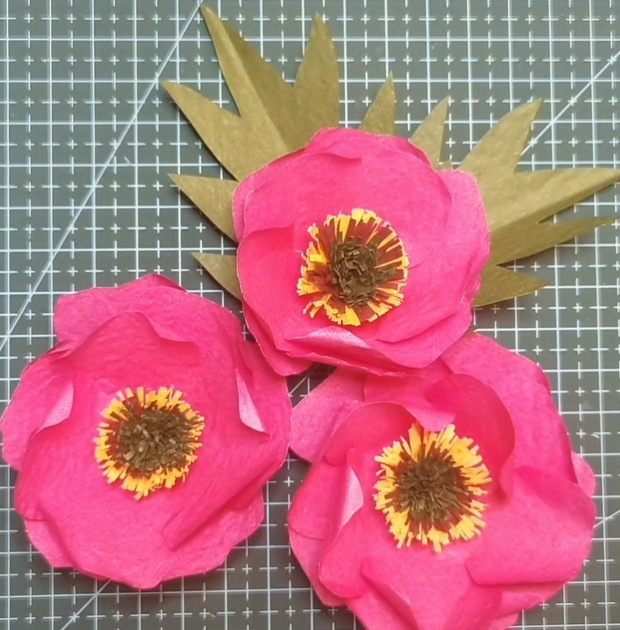
Three cupped corollas stacked off-centre, a three-colour fringe centre, and two palmate leaves glued straight to the back. No wire, no stem, no floral tape — and a five-minute filmed walkthrough that shows the three shaping moves most people skip.
Everything you need, no guesswork
Everything is sized to print at 100%. No scaling, no "fit to page", no measuring against a ruler on screen.
Printable pattern
1:1 actual size on both A4 and US Letter. One five-lobed corolla and one palmate leaf, printed once each — you use them as templates and cut three corollas and two leaves.
Cut file
One layer, two named groups — part-corolla and part-leaf — so you can select and duplicate a single piece before cutting. No fold lines, no score lines, no wire guides.
Video walkthrough
Five minutes, filmed straight down over the work. English step titles are burned in at the start of each stage, so it works with the sound off.
Materials & assembly guide
Paper weight, the size of every piece, how to cut and curl the three-colour fringe centre, and what to do when your crepe is heavier or lighter than mine.
Measured, not estimated
Each shape prints at the size below. The pattern sheet shows every shape once — cut the number of pieces in the last column, using each shape as a template.
| Shape | Size | Pieces |
|---|---|---|
| Corolla (5-lobed) | 60.0 × 61.2 mm (2.4 × 2.4 in) | 3 |
| Leaf (palmate) | 49.2 × 81.4 mm (1.9 × 3.2 in) | 2 |
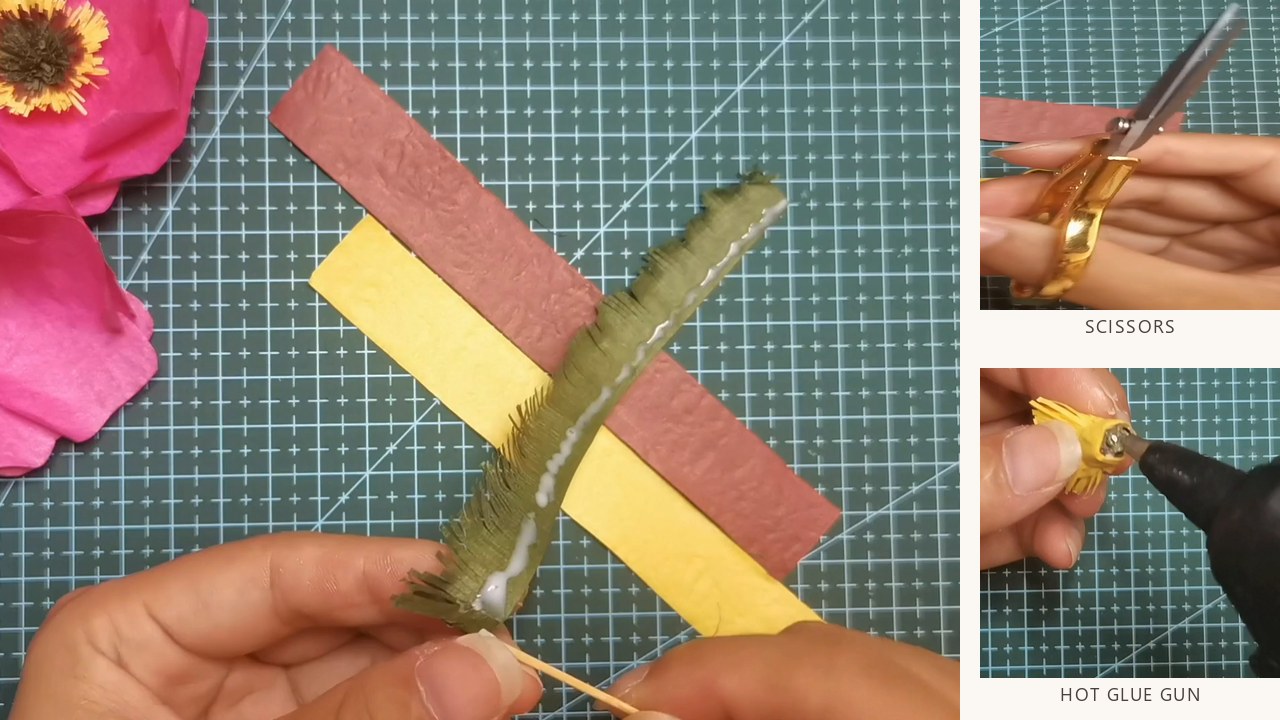
| Centre fringe (hand-cut) | 20 × 150 mm (¾ × 6 in) | 3 strips |
One bloom uses three corollas, two leaves and three fringe strips — one yellow, one pink or terracotta, one olive. The fringe strips are not on the pattern sheet: cut them by hand to the size above. Finished bloom measures roughly 60 mm across, depending on how much you cup each corolla.
What you'll need
Fewer materials than a stemmed flower — this design has no stem and no leaf wire.
| Item | Notes |
|---|---|
| Crepe paper | 90–140 gsm · pink for the corollas, olive for the leaves |
| Centre colours | Yellow + terracotta (or a second pink) + olive |
| Scissors | Small and sharp — or a cutting machine |
| Curling tool | Tweezers, a quilling tool, or the back of a scissor blade |
| Hot glue gun | Low-temperature — high heat scorches crepe |
| White craft glue | PVA, for the petal overlaps when cupping each corolla |
No floral wire, no tape and no stem are needed. A cutting machine is optional — the original peonies were cut entirely by hand.
Three moves that make it a peony
A flat five-lobed corolla looks like a daisy. These three moves are what turn it into a peony — and none of them show on the flat pattern, which is exactly why they're easy to skip.
Snip, don't cut through
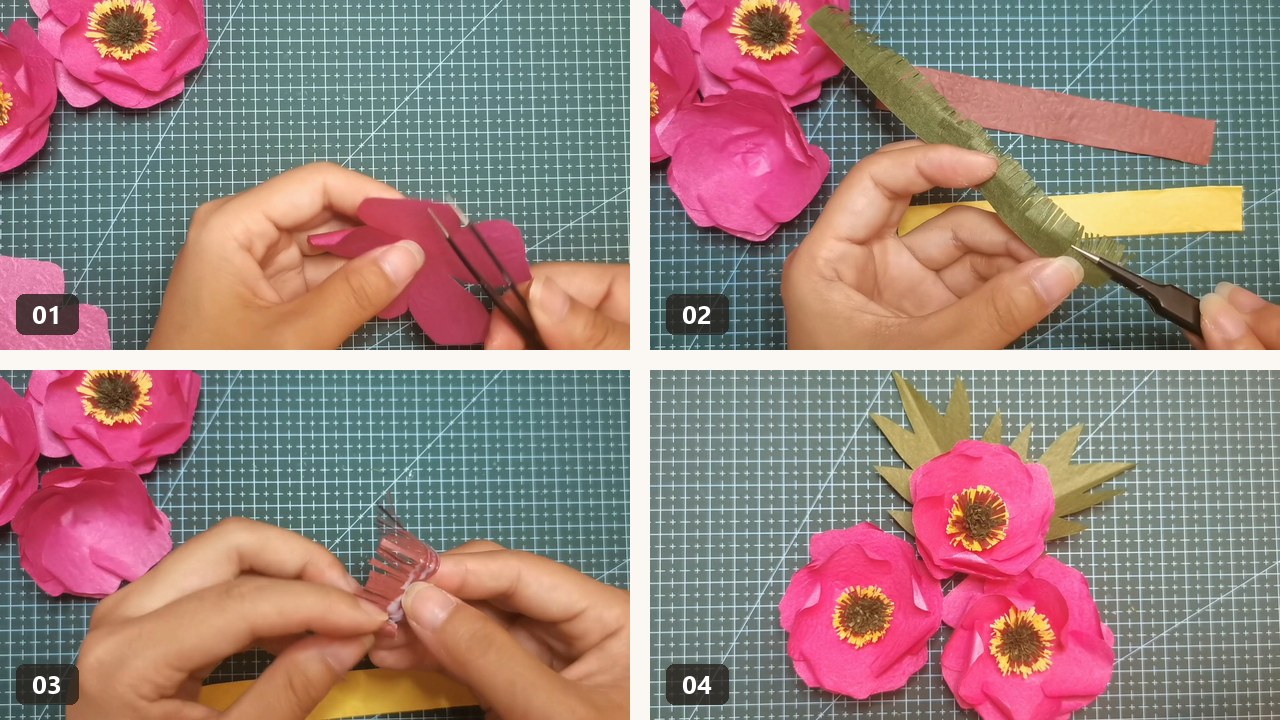
Make one short cut into each valley between the five lobes, a third to a half of the way in. Stop before the centre — all five lobes must still be joined. These snips are what let neighbouring petals overlap. Cut all the way through and you have five separate petals that won't hold a shape.
Curl every petal edge back
Roll the tip of each petal backwards around the tip of your tweezers. The backwards curl is what gives the bloom its rounded, layered look. A flat corolla reads as a daisy, not a peony.
Overlap, glue, cup
A dab of white glue on one petal edge, press it across the snip onto its neighbour, work around until the corolla holds a shallow cup without resisting. Then stack the three corollas, rotating each 30–40°, and glue only at the centre.
The fringe centre and the final assembly are in the video: 1:55–4:15 covers fringing the three strips 10 mm deep, stacking them, rolling the stack and setting it into the bloom. The leaves glue straight to the back of the finished flower, pointing in opposite directions. Nothing is taped, nothing is wired.
What you're allowed to do
Short version: make things and sell them. Just don't sell the files themselves.
Included with your purchase
- Print and cut the templates as many times as you like, for yourself or as gifts.
- Sell up to 500 finished physical flowers made from these templates — craft fairs, local shops, Etsy, wedding work.
- Use finished flowers in your own product photography and social posts.
- Photocopy the pattern for a workshop you teach, up to 15 students per session.
Not permitted
- Sharing, reselling or redistributing the PDF, SVG or video files — free or paid.
- Uploading the files to any clip-art, template, or file-sharing platform.
- Using the files to train or feed generative AI models.
- Mass production beyond 500 pieces — get in touch and we'll arrange an extended license.
Before you buy
How is this different from the daisy?
The daisy is a flat, many-petalled flower on a wired stem. The peony is three cupped corollas stacked into one rounded bloom with a three-colour fringe centre, and it uses no wire or tape at all — the leaves glue straight to the back of the flower. If you've made the daisy, the peony is the next step up in shaping, not in tooling.
Do I need floral wire, tape or a stem?
No. This design has no stem and no leaf wire, so the shopping list is shorter than for a stemmed flower: crepe in four colours, scissors, something to curl with, a low-temperature glue gun and white PVA. That is all.
Do I need a Cricut or Silhouette?
No. The original peonies were cut by hand with small scissors, and the video works through that method from start to finish. The SVG is there for anyone who prefers a machine — it has a single cut layer with the corolla and leaf as separate groups, so you can duplicate a piece before cutting.
What paper should I use?
Italian or German crepe paper in the 90–140 gsm range. Heavy florist crepe at the top of that range holds the cupped shape best; standard tissue or party crepe is too soft and the petals flop instead of opening. The guide covers the weight that works and how to check which way your crepe stretches before you cut.
How long does one flower take?
The walkthrough runs five minutes and covers the whole flower. Real working time is longer than the video — most of it goes into cutting and curling each corolla properly, and the first bloom always takes longer than the third.
Is this a physical product?
No. It's a digital download — you'll get a download link the moment payment clears. Nothing ships. You print the pattern on your own printer or at a copy shop.
Can I sell what I make?
Yes — up to 500 finished flowers, no royalty owed. That covers craft fairs, market stalls and small online shops. If you're planning wedding-scale or retail volumes beyond that, an extended license is available.
What if the files won't open, or my printer scales the pattern?
Email everbloompaper2024@outlook.com and you'll get a reply within one business day. Nine times out of ten it's a "fit to page" setting — every page carries a 100 mm scale line, so you can tell in two seconds whether your printout is the right size.
What's your refund policy?
Because these are digital files delivered instantly, sales are final once the download link is issued — you're asked to confirm this at checkout. If a file is corrupted or won't open, you'll get a replacement or a full refund, whichever you prefer. Full details are in the Terms of Service.
Three corollas, one bloom
Print it tonight, cut it tomorrow. The pattern is sized correctly — the rest is paper, a pair of tweezers and a little patience.
Get the template — $12.99